You know that feeling? You bite into a brownie and the whole world just stops. The gooey center, that crackly top, chocolate coating your tongue. That’s what I’ve been chasing in my kitchen for way longer than I’d like to admit.
But the road to get there. Oh man. Dry bricks that crumbled like sand. Batter that refused to set no matter what I did. Rubbery squares that made my jaw hurt. Been through all of it. Multiple times.
I’ve messed around with ratios, temperatures, techniques. Tried recipes from famous pastry chefs, tweaked the classics, screwed things up, started over. And finally figured out the science behind this thing. Today I’m laying it all out. From the chemistry to the recipe that hasn’t failed me yet.
What Perfect Brownies Should Look Like
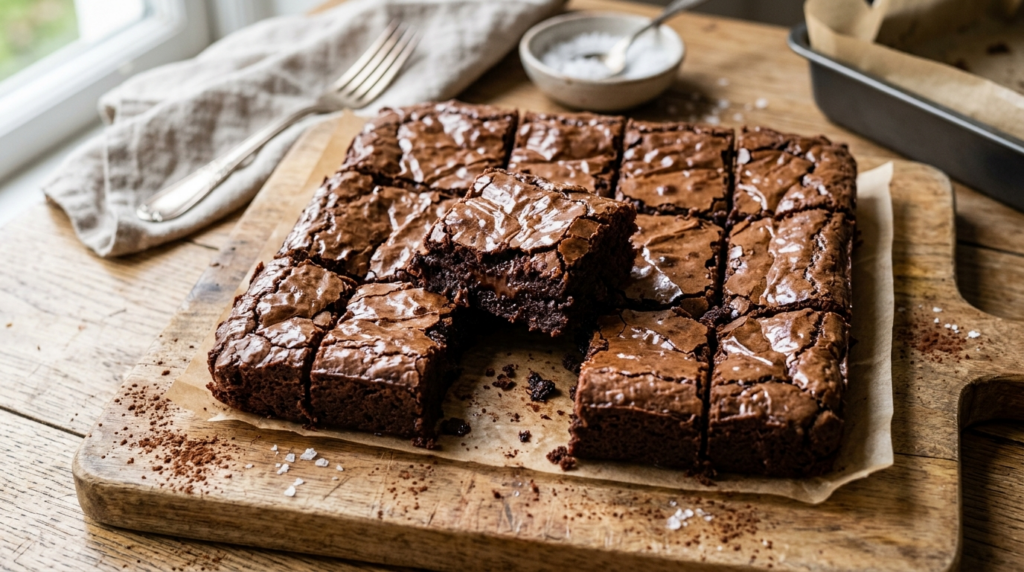
Before we get into the weeds, let’s nail down what we’re actually going for here. A perfect brownie isn’t just some “chocolate square.” It’s a balance of opposites. Sounds pretentious but it’s true.
The outside needs a thin shiny crust with a little crunch to it. That signature crackly top that shows up when you whip your eggs and sugar the right way. If you’ve seen it, you know exactly what I’m talking about.
The inside has to be moist and dense but not raw. When you break a piece apart it should pull slightly, leaving chocolate crumbs on your fingers. If it snaps clean, something went wrong somewhere.
Flavor. Deep intense chocolate without being cloyingly sweet. A subtle bitterness from quality cocoa. And a pinch of sea salt. Yeah, salt. Sounds weird if you haven’t tried it. Just try it.
Texture. Fudgy not cakey. This is everything. A brownie is not a chocolate cake. It should be dense, buttery, almost like fudge. If someone cuts into your brownie and it looks like a cupcake inside, that’s a cake. I don’t make the rules I just report them.
Quick thing about ingredients. If you’ve only got white sugar and no brown sugar, don’t freak out. It’ll work. The center might be a little less toffee-like but the world won’t end. Now if you’re thinking about swapping butter for margarine… please don’t. I can’t help you there.
Why Your Brownies Keep Failing
First trap is the flour to fat ratio. Too much flour and you get cake. Too little and the batter spreads everywhere like it’s trying to escape. Here’s the science bit: flour has gluten. In brownies we want minimal gluten development. Enough to hold moisture but not so much that it creates an airy crumb. The sweet spot is roughly 3 parts fat (butter plus chocolate) to 1 part flour by volume.
Second problem is overbaking. This one kills more brownies than anything else. Carryover heat is real. When you pull brownies from the oven they keep cooking for another 10-15 minutes. Golden rule: take them out when the center still looks a bit wet. If your toothpick comes out clean, you’re already too late. I know that sounds scary. Trust me on this one.
Third thing is cheap chocolate and cocoa. Brownies are a chocolate dessert. Garbage in garbage out. I’ve tried everything from fancy artisan bars that cost more than my lunch to regular stuff from the baking aisle. Honestly? Lindt 70% dark is my go-to. Melts great, consistent flavor, doesn’t cost a fortune. Use melted dark chocolate for moisture and cocoa powder for depth. I tried using just one or the other so many times. Never as good.
Fudgy Brownie Recipe Step by Step

What you’ll need (8×8 inch pan):
- dark chocolate 7 oz (60-70% cocoa),
- unsalted butter 5 oz,
- three large eggs at room temperature,
- sugar 1 cup (half white half brown if you have it),
- vanilla extract 1 teaspoon,
- all-purpose flour 2/3 cup,
- dutch-process cocoa powder 1/4 cup,
- sea salt 1/2 teaspoon.
And if you want, about 3.5 oz of chocolate chunks for texture. Not required but highly recommended.
Alright let’s do this.
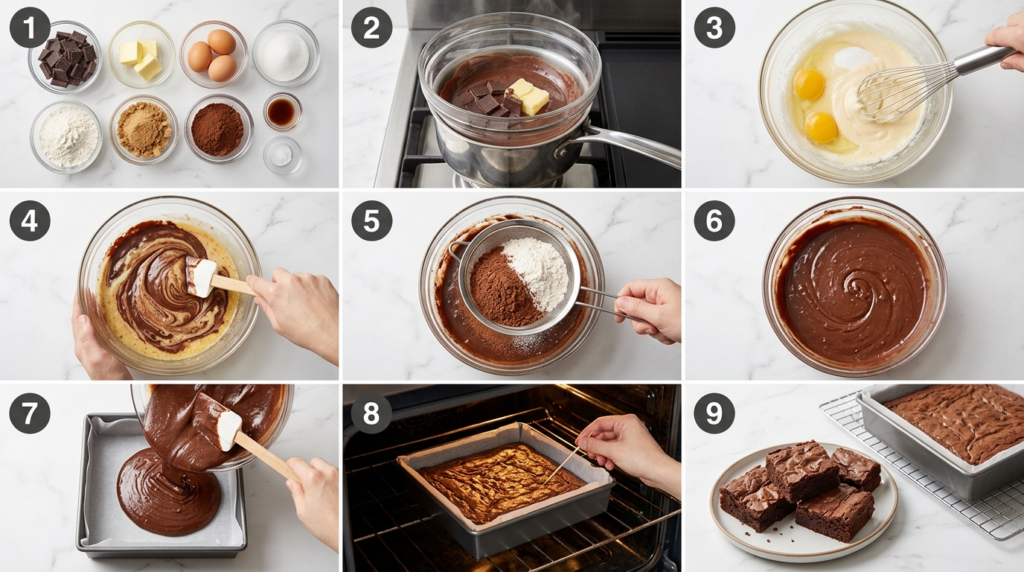
First thing I do is preheat the oven to 325°F. Not 350°F. Line the pan with parchment so the edges hang over the sides. Makes it way easier to lift out later.
Melt the chocolate and butter together over a double boiler. Then let it cool down to about 105°F. Important: don’t add eggs to hot chocolate. Unless you want chocolate scrambled eggs. I did this once. It was depressing.
While the chocolate cools, I whisk the eggs and sugar for about 3-4 minutes. This is legit an arm workout but it’s how you get that shiny crackly top. The mixture should get lighter and fluffier.
Then I fold the chocolate mixture into the eggs. Big slow movements. No aggressive stirring.
Oh and almost forgot. Sift the flour with the cocoa and salt first. Then add it to the batter and fold maybe 15 times max. Soon as those flour streaks disappear, stop. Put the spatula down. Walk away from the bowl if you have to.
Bake for 25-28 minutes. The center should jiggle a little when you shake the pan. That jiggle is your friend. Don’t be afraid of the jiggle.
And here’s the hardest part. Cooling. At least 2 hours on the counter. Look, one time I thought I was clever and stuck the hot pan in the freezer to speed things up. The glass pan shattered. Glass in my brownies. Spent the evening cleaning the kitchen and feeling sorry for myself. Don’t be me. Let them cool on the counter.
Brownie Recipe Variations

Nuts are always a good call. I add about a cup of toasted walnuts. Toasted, not raw. Raw nuts in brownies is a missed opportunity and honestly kind of sad.
Raisins in brownies though? That’s where I draw the line. If you’re someone who does that… I mean, go ahead I guess. But we probably can’t be friends.
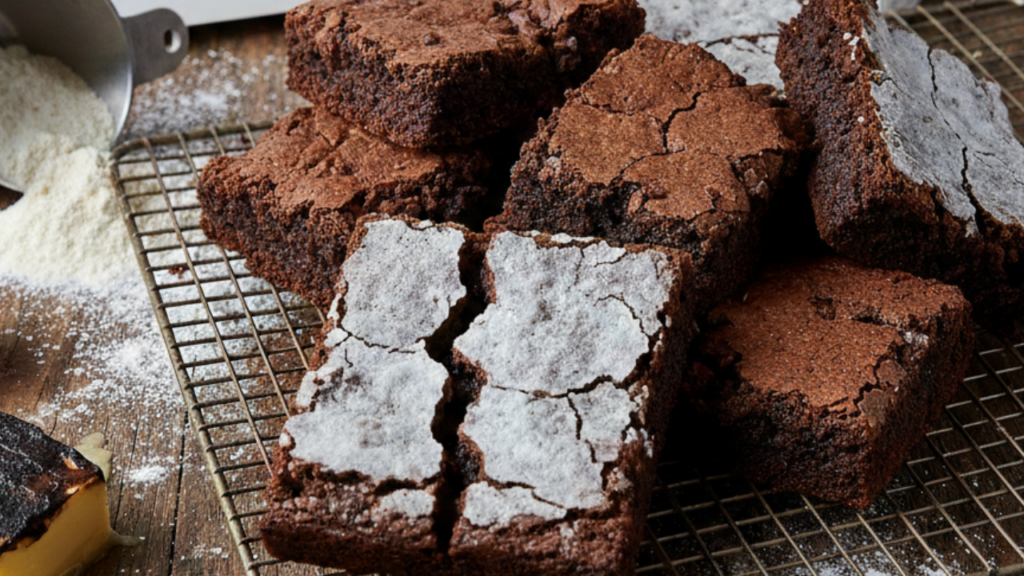
How to Store Brownies and When to Eat Them
Properly made brownies keep for about 5 days. And honestly they taste better on day two than day one. Something about the flavors settling. Microwave a square for like 10 seconds, drop a scoop of vanilla ice cream next to it. And just enjoy. You earned it.