

I’ve thrown away more failed loaves than I’d like to admit. Flat ones, dense ones, ones that smelled like old beer. Every failure taught me something about yeast that no cookbook bothered to explain. Here are the 7 yeast mistakes I kept making before I finally understood what was going wrong. If your bread isn’t turning out right, one of these is almost certainly the reason.
The Brioche That Started It All
Thanksgiving 2019. I bought expensive French flour and spent a week watching tutorials. My brioche rolls came out hard as rocks. It took me weeks to figure out what went wrong, and when I finally did, I was frustrated because the answer was so basic.
Your Tap Water Might Be Killing Your Yeast Dough
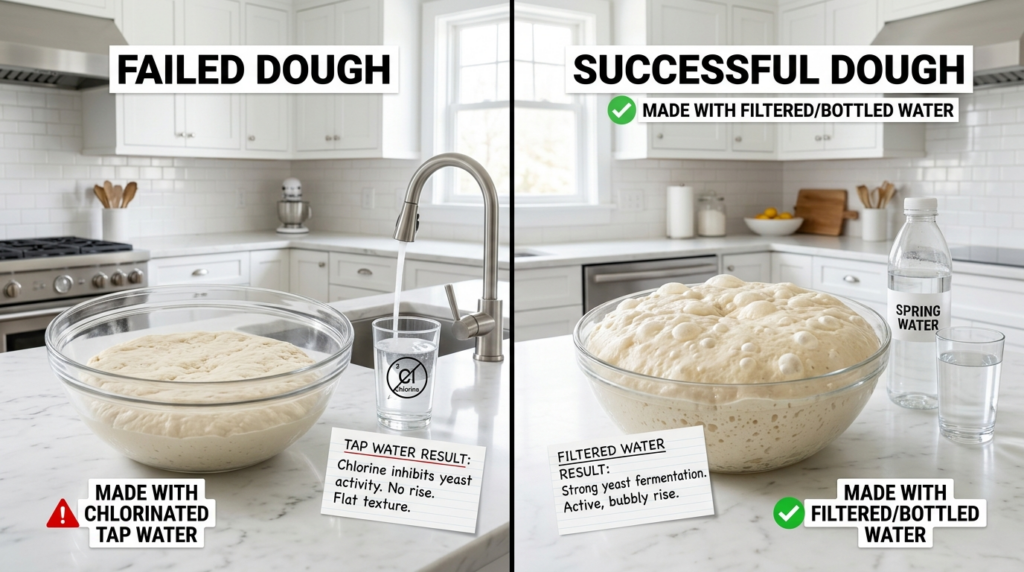
Many home bakers overlook this completely. I went through dozens of baking blogs before I found a single mention of how water hardness affects yeast fermentation. Hard water contains high levels of calcium and magnesium. A small amount of minerals is actually helpful for yeast. But when the mineral content is too high, it tightens the gluten structure so much that the dough becomes stiff and the yeast can’t generate enough lift.
Very soft water creates the opposite problem. Distilled or reverse-osmosis filtered water gives you a slack, sticky dough with almost no structure.
I bought a cheap TDS meter and tested my tap water. Turned out it was extremely hard. That explained a lot. So I ran an experiment. Same recipe, same yeast, same kitchen temperature. One batch with my tap water, one with regular bottled spring water from the grocery store. The spring water batch rose almost one and a half times higher. Everything else was identical.
My fix is straightforward. I mix half tap water with half bottled spring water for all my bread doughs now. If your water is very soft, a microscopic pinch of calcium chloride helps. Truly microscopic. On the tip of a knife.
This matters even more if you’re baking in different parts of the world. London tap water is notoriously hard. Scandinavian water tends to be very soft. It’s worth spending a few minutes figuring out what’s coming from your faucet before you blame the yeast.
How to Tell If Your Yeast Is Dead Before You Waste Two Hours
Yeast has a real expiration date. Those little 7-gram packets keep until the printed date as long as they stay sealed and stored somewhere cool. But once you open a bigger jar, air and moisture start degrading the yeast right away.
I keep my opened SAF Red in a glass jar in the freezer. Works well for about eight months. But I once left a jar of Fleischmann’s on my kitchen counter for three weeks during a Houston summer. When I proofed it in warm water with sugar, nothing happened. No bubbles, no foam. The yeast was completely dead.
Fresh compressed yeast (the crumbly block kind more common in European stores, usually sold in 42-gram cubes) is even more sensitive. Two weeks in the fridge, maximum. It should smell clean and faintly mushroomy. Once it turns dark or smells sharp and sour, throw it out.
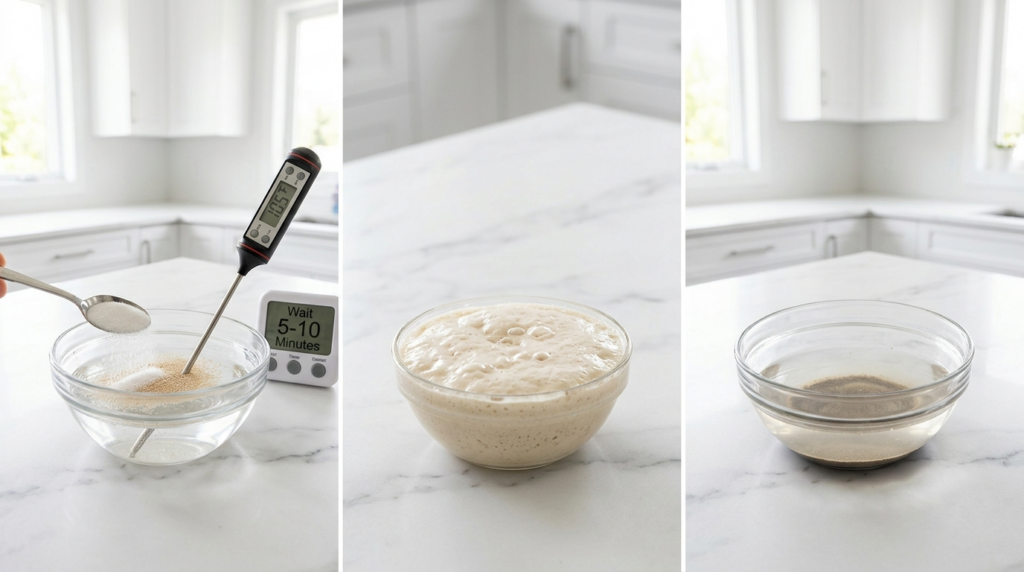
Here’s my standard test for any yeast I haven’t used recently. Dissolve about a teaspoon of yeast in half a cup of warm water, right around body temperature or a touch warmer. Add half a teaspoon of sugar. Wait ten minutes. You should see a bubbly foam layer on top, at least a centimeter thick. It’ll smell bready and alive. No foam means the yeast is dead, and adding extra dead yeast doesn’t compensate. I’ve tried. It doesn’t work.
The Milk Temperature Mistake I Made for Three Years
This one cost me a lot of wasted dough before I figured it out.
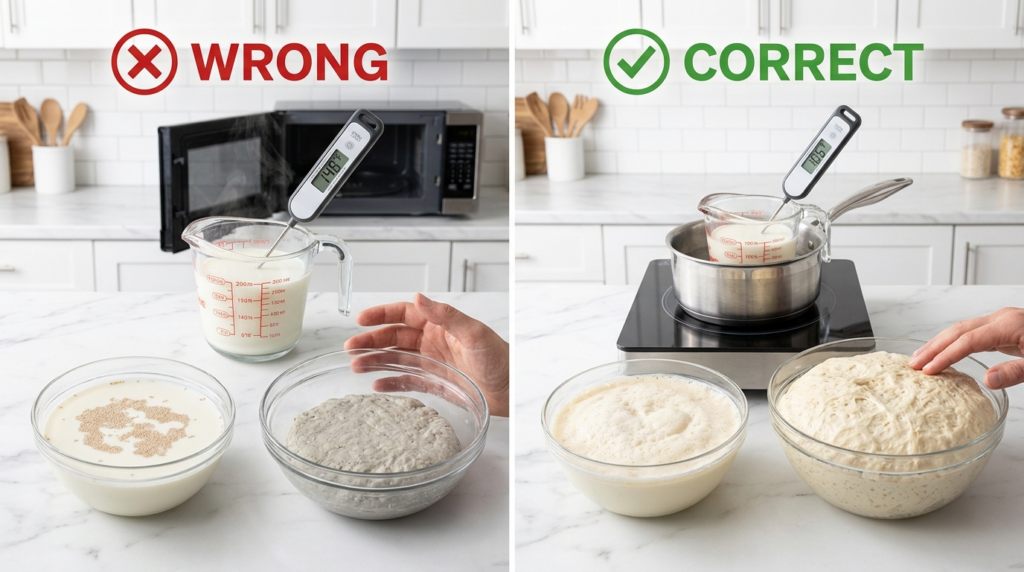
Yeast starts dying above about 120°F (50°C). By 140°F (60°C) every cell is gone. Below about 95°F (35°C), yeast works, but slowly. The sweet spot is right around body temperature, maybe slightly warmer.
Milk is tricky because it holds heat differently than water. You warm it on the stove, touch it, think it feels fine, and pour it onto your yeast. But the internal temperature can be significantly higher than what you feel on the surface. When I finally bought a basic instant-read thermometer, I discovered I’d been overheating my milk almost every time. Three years of mediocre cinnamon rolls, and the solution was a fifteen-dollar thermometer.
One important rule is to never use a microwave to warm milk for yeast. Microwaves create hot spots throughout the liquid. You can have perfectly warm milk with a hidden pocket of scalding milk in the center, and that pocket will kill the yeast before you even stir. Just warm it gently on the stove and check with a thermometer.
I use whole milk for all enriched doughs now. I tried skim milk once and the difference in texture and flavor was so noticeable that I never went back. The fat in whole milk makes the crumb softer and the taste richer.
Why Salt and Yeast Should Never Touch Each Other
I used to think this was just an old baking myth. Then I tested it.
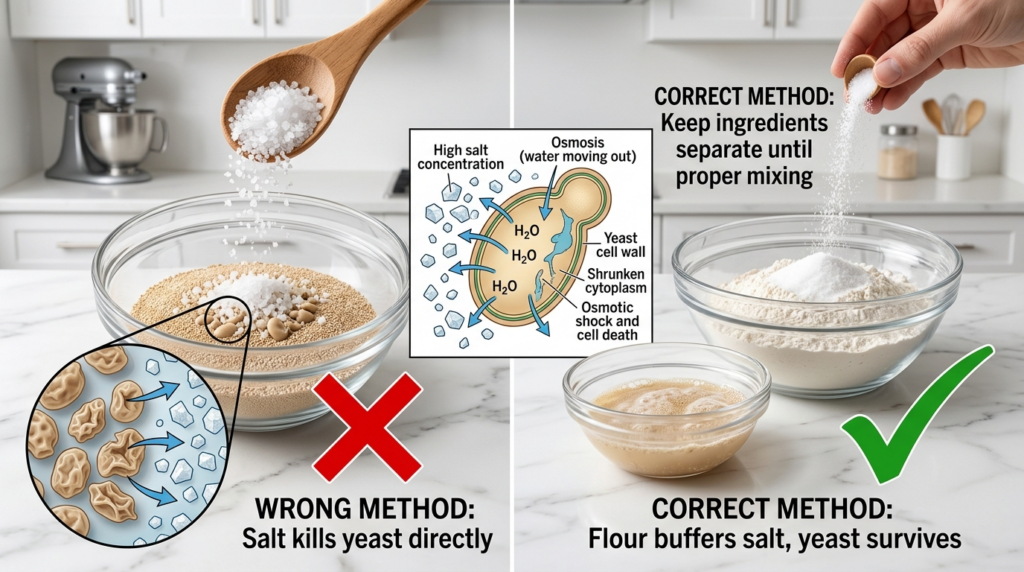
Salt is hygroscopic. It pulls moisture out of whatever it contacts, including living yeast cells. Direct contact dehydrates and kills them before fermentation can begin.
I ran a side-by-side comparison. Two identical batches of basic white bread dough: 500 grams of bread flour, same water, same yeast, same salt. In the first batch, I mixed salt and yeast together before adding water. In the second, I placed yeast on one side of the flour and salt on the other, then combined everything with water at once.
The results were clear. The first batch took two hours and forty minutes to rise. The second took an hour and thirty-five minutes. Same kitchen, same afternoon. Direct contact with salt nearly doubled the rise time. Still, you can’t skip salt entirely. The right proportion is 1.8 to 2 percent of flour weight. Without it, bread tastes flat and the dough overferments into a sticky mess. Salt controls fermentation speed, strengthens gluten, and gives bread its flavor. Just add it to the opposite side of the bowl from your yeast, then mix everything together. Five extra seconds.
Not All Yeast Is the Same
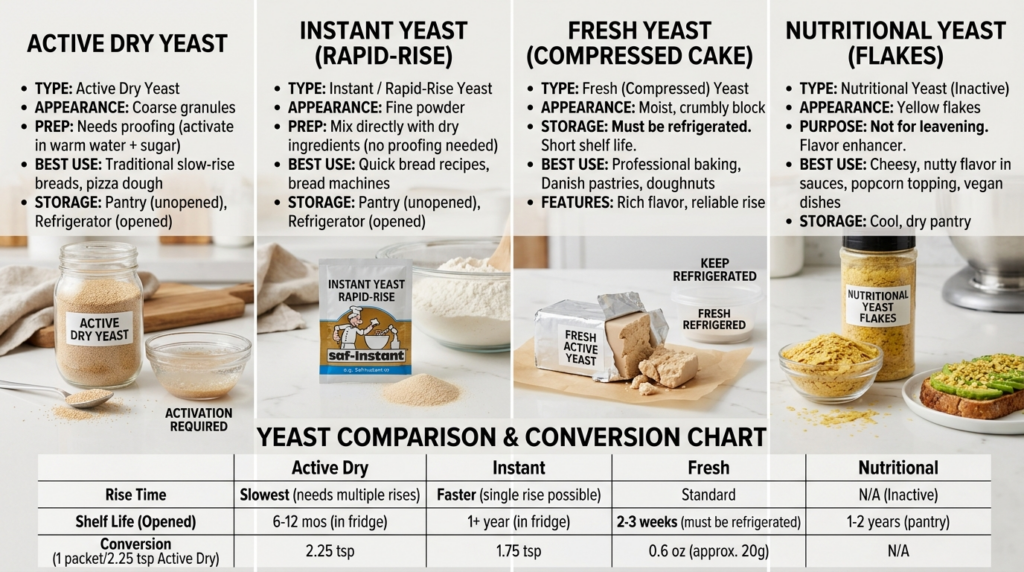
For years I treated every type of yeast as interchangeable. Active dry, instant, fresh, whatever was on the shelf. That was a consistent source of problems.
Active dry yeast has a layer of dead cells on the outside that protects the living ones inside. It needs to be dissolved in warm water first. That’s proofing. Takes about five to ten minutes. Instant yeast (sometimes labeled “bread machine yeast” or “RapidRise”) has smaller granules, no dead outer layer, and goes directly into dry ingredients without proofing. It’s about 25 percent more potent, so where you’d use a full 7-gram packet of active dry, you only need 5 to 6 grams of instant.
Fresh compressed yeast requires about double to triple the weight of dry yeast. A recipe calling for 7 grams of dry yeast needs 14 to 21 grams of fresh. Crumble it into the warm liquid and stir.
Then there’s SAF Gold, an osmotolerant yeast designed for sweet, high-sugar doughs. Regular yeast struggles when there’s a lot of sugar in the recipe because sugar pulls water away from yeast cells through osmosis. SAF Gold is bred to thrive in that environment. I use it for babka, panettone, and anything with a high sugar content. The first time I tried it in a chocolate babka, the rise was dramatically better than anything I’d gotten from regular yeast. It was a genuine improvement, not a subtle one.
Stop Rushing Your Dough
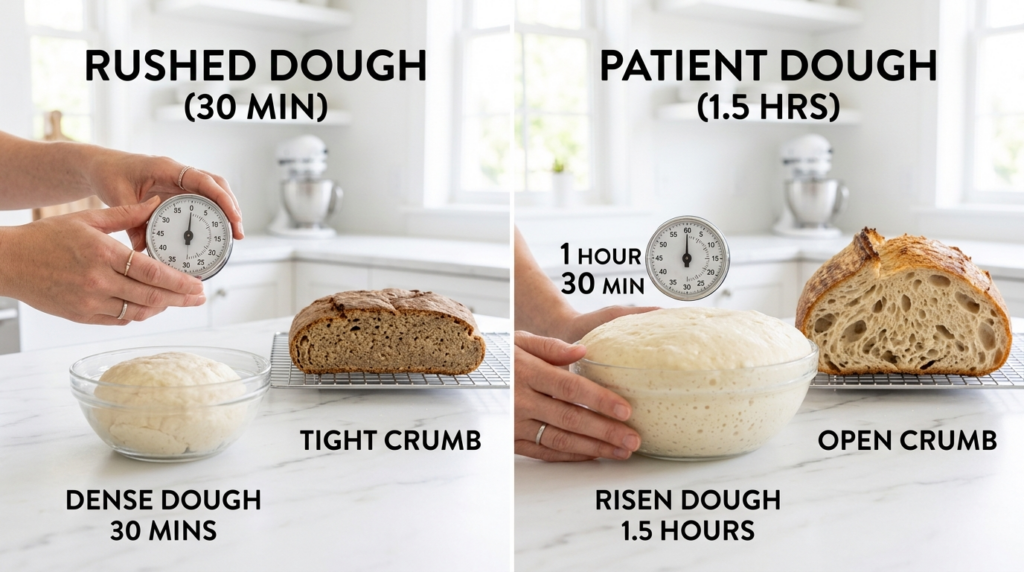
I understand the temptation. The dough looks like it doubled. It’s been 35 minutes. You’re hungry and you want warm bread.
But fermentation is where all the flavor develops. Organic acids form. Gluten relaxes. The open, airy crumb you see in bakery bread comes from time, not from a secret ingredient. Cut the rise short and you get bland, dense bread every time.
Properly fermented dough doesn’t just look bigger. It feels different. Puffy and soft. Poke it with a floured finger and the dent springs back slowly, not instantly. It smells yeasty with a slight tang rather than like raw paste.
At normal room temperature, most basic doughs need one to one and a half hours for the first rise and about 45 minutes to an hour for the second rise after shaping. In winter, when my kitchen drops to about 65°F (18°C), everything takes longer. Two hours minimum for the first rise.
The biggest improvement in my bread came from cold fermentation. Putting dough in the fridge for 12 to 24 hours produces noticeably more complex flavor. Same recipe, same ingredients, but the cold-fermented version has a slight tang and real depth that same-day bread just doesn’t have. Now I plan ahead whenever I can.
Wrong Flour, Flat Bread
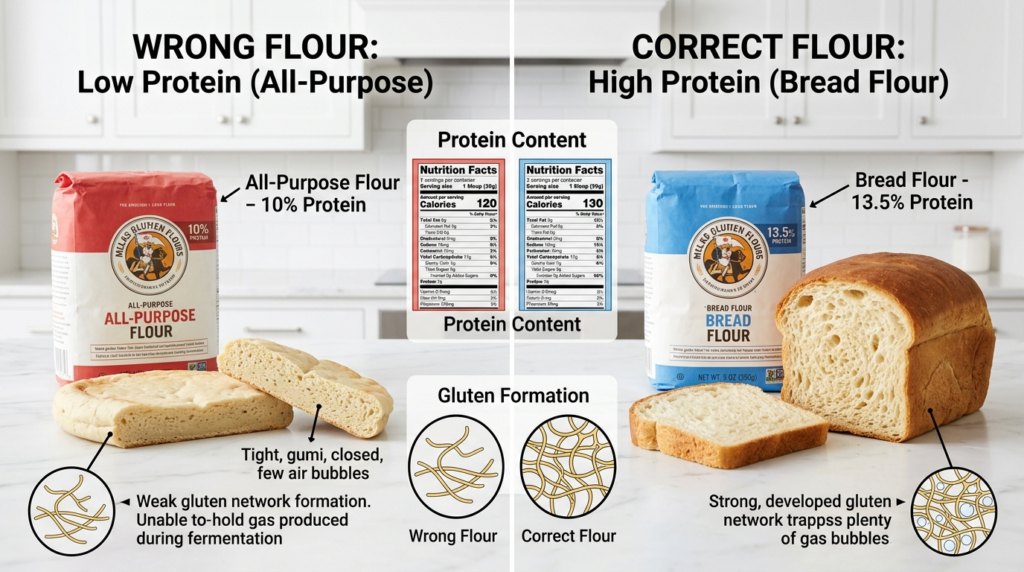
This mistake is hard to catch because everything else can be perfect. Your yeast is alive, the water temperature is right, salt is nowhere near the yeast. And the bread still comes out flat and dense.
Check your flour. All-purpose runs about 9-10% protein. Bread flour is 12-13%. That gap sounds small but it makes a significant difference. Yeast produces gas just fine in weak flour, but the gluten network can’t hold the gas in. It escapes. The bread puffs up slightly, then collapses and spreads.
I usually buy King Arthur bread flour, but my store is frequently sold out, so I end up with Bob’s Red Mill Artisan about half the time. I haven’t noticed a meaningful difference between them in the finished loaf.
For enriched doughs like brioche, I blend about 70% bread flour with 30% all-purpose. The eggs and butter already tenderize gluten, so using 100% bread flour can make the result chewy rather than soft. That ratio took me several batches to dial in, but it’s been consistent ever since.
One more thing: don’t use self-rising flour for yeasted bread. It already contains baking powder and salt. Adding yeast creates competing leavening reactions and the result is a dense, metallic-tasting brick.
Substitutions That Have Saved Me
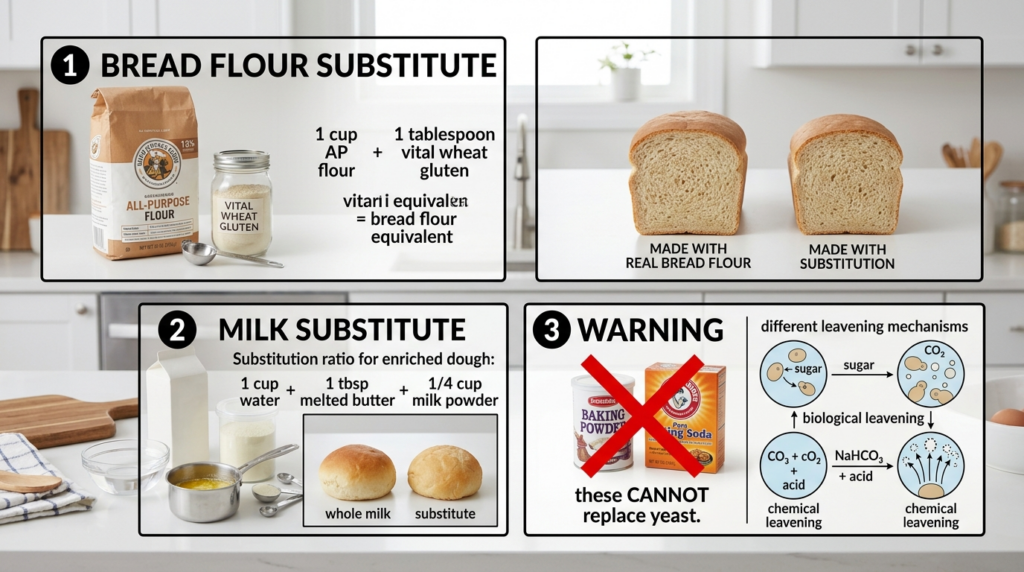
If you don’t have bread flour, add about a tablespoon of vital wheat gluten per cup of all-purpose flour. It raises the protein content to bread flour levels. I’ve done this many times with results that are nearly indistinguishable.
If you’re out of milk for an enriched dough, water plus a tablespoon of melted butter and a tablespoon of milk powder per cup of liquid gets you most of the way there. Oat milk also works fine. I tried soy milk once and something went wrong with the gluten development. I never figured out exactly why and haven’t tried it since.
Also, you cannot substitute baking powder or baking soda for yeast since they rely on completely different leavening mechanisms.
Yeast Types at a Glance
| Yeast Type | Amount per 500g Flour | Cups/Teaspoons | Needs Proofing? | Best For |
|---|---|---|---|---|
| Active Dry | 7 g | 2¼ tsp | Yes | Everyday bread, pizza dough |
| Instant (SAF Red, RapidRise) | 5-6 g | 1¾ tsp | No | Quick weeknight bread |
| Fresh Compressed | 14-21 g | About half a cube | Crumble into liquid | Croissants, European-style breads |
| Osmotolerant (SAF Gold) | 7 g | 2¼ tsp | No | Babka, panettone, sweet rolls |
How I Store My Bread and Leftover Dough
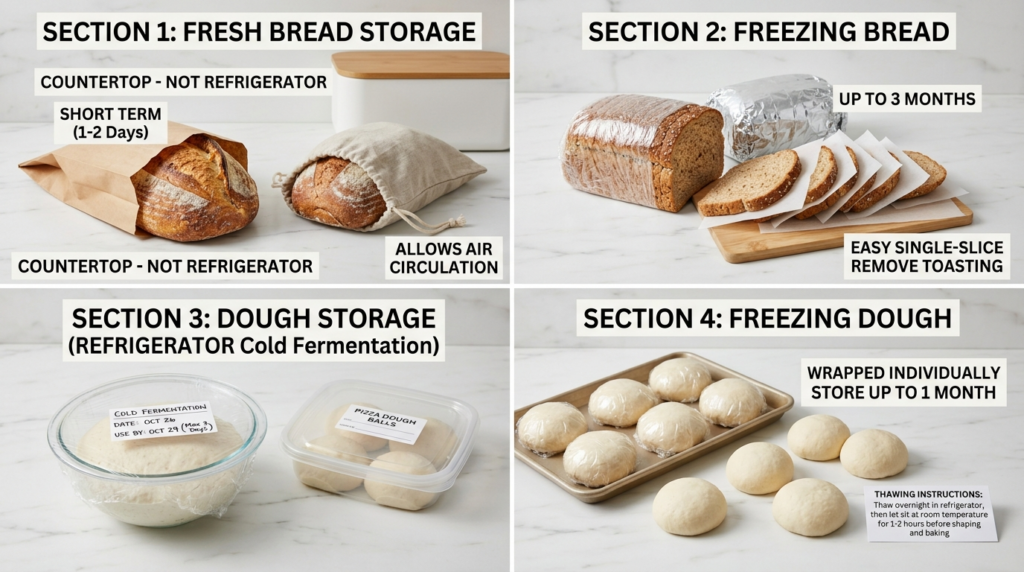
Homemade bread keeps about 2 to 3 days at room temperature. I wrap mine in beeswax wrap or keep it in a bread box. Paper bags keep the crust crispy but dry out the crumb faster. Plastic bags retain moisture but soften the crust. Both are fine depending on your preference.
For longer storage, freezing works well. I slice the bread first, place parchment between the slices, bag it, and press out as much air as possible. It goes straight from the freezer into the toaster. Add about thirty seconds to your usual toasting time. Avoid microwaving frozen bread. It turns the texture rubbery.
Leftover raw dough can go in the fridge for up to 48 hours. Punch it down and wrap it tightly. Some of the best loaves I’ve baked were dough that sat in the fridge for two days. Pull it out, let it warm up for about an hour, shape, proof, and bake. The extended cold fermentation only improves the flavor.
If you have questions about any of this or your own yeast stories to share, leave them in the comments. Good luck with your next bake.